ReAct Agent 是一种将 推理(Reasoning)与 行动(Acting)结合起来的智能体。它是智能体的核心科技,也是智能体框架中最能表现其自主性的组件。
它的工作流程遵循三步循环:
思考
行动
观察
这个循环会持续进行,直到 LLM 判断任务已经完成或无法继续。
这意味着智能体可以通过工具调用,自动补足当前未知的上下文信息。然后基于新获取的信息,做出下一步决策。比如你要智能体查询一个数据表中的记录,它可能尚不知道数据库中有哪些表,表中有哪些字段。但是通过几轮主动查询与观察,即使你询问的信息比较模糊,它大概率也能从表名和字段中推测出你需要的记录是哪一条。这就是 ReAct Agent 的威力。
本节将介绍:
如何创建简单的 ReAct Agent
如何创建带工具的 ReAct Agent
如何创建带工具权限的 ReAct Agent
结构化输出
流式输出
一、环境配置
1)安装依赖
你可以下载 本仓库 到本地,然后运行以下命令,安装完整的 Python 依赖:
cd dive-into-langgraph
pip install -r requirements.txt
依赖包列表
以下为 requirements.txt 中的依赖包清单:
pydanticpython-dotenvlangchain[openai]langchain-communitylangchain-mcp-adapterslangchain-text-splitterslanggraphlanggraph-cli[inmem]langgraph-supervisorlanggraph-checkpoint-sqlitelanggraph-checkpoint-redislangmemipynbnamefastmcpbs4scikit-learnsupervisorjiebadashscopetavily-pythonddgs
或者,你也可以直接安装 LangGraph,遇到缺少的依赖再行安装:
pip install langgraph langchain2)导入依赖
使用 .env.example 创建 .env 文件:
cp .env.example .envPS: 本教程使用阿里百炼平台的模型。你需要在 阿里百炼平台 注册账号,并将获得的 API 密钥填入 .env 文件中的
DASHSCOPE_API_KEY变量。
import os

from dotenv import load_dotenv
from IPython.display import HTML, display, update_display
from langchain_openai import ChatOpenAI
from langchain.agents import create_agent
from langchain.chat_models import init_chat_model

# 加载模型配置
# 请事先在 .env 中配置 DASHSCOPE_API_KEY
_ = load_dotenv()
3)加载 LLM
下面是两种加载大模型的方法,任选一种就行:
# 方法一:使用 ChatOpenAI 加载 LLM
llm = ChatOpenAI(
    model="qwen3-coder-plus",
    api_key=os.getenv("DASHSCOPE_API_KEY"),
    base_url=os.getenv("DASHSCOPE_BASE_URL"),
)

# 方法二:使用 init_chat_model 加载 LLM
llm = init_chat_model(
    model="qwen3-coder-plus",
    model_provider="openai",  # Qwen 兼容 OpenAI API
    api_key=os.getenv("DASHSCOPE_API_KEY"),
    base_url=os.getenv("DASHSCOPE_BASE_URL"),
)
二、简单的 Agent
首先,创建一个最简单的 ReAct Agent。
# 创建一个简单的Agent
agent = create_agent(
    model=llm,
    system_prompt="You are a helpful assistant",
)

# 运行Agent
response = agent.invoke({'messages': '你好'})

response['messages'][-1].content
'你好呀!✨ 很高兴见到你!今天过得怎么样?希望你度过了愉快的一天。我随时准备好陪你聊天、帮你解决问题,或者就这样轻松愉快地闲聊一会儿。有什么想跟我分享的吗? 🌟'# 可视化 Agent
agent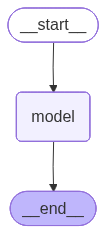
三、带工具调用的 Agent
接下来,我们创建一个带工具调用的 ReAct Agent,它会根据需求自主决定是否调用工具。
# 一个工具函数
def get_weather(city: str) -> str:
    """Get weather for a given city."""
    return f"It's sunny in {city}!"

# 创建带工具调用的Agent
tool_agent = create_agent(
    model=llm,
    tools=[get_weather],
    system_prompt="You are a helpful assistant",
)

# 运行Agent
response = tool_agent.invoke(
    {"messages": [{"role": "user", "content": "what is the weather in sf"}]}
)

response['messages'][-1].content
'The weather in San Francisco (SF) is currently sunny!'# 可视化 Agent
tool_agent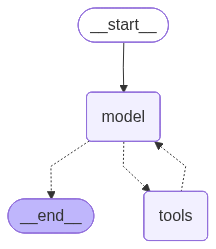
四、使用 ToolRuntime 控制工具权限
下面创建一个带 runtime 的工具,runtime 类型为 ToolRuntime。当我们调用 Agent 时,会将这个 runtime 传递给工具。工具再根据 runtime 中的信息,判断当前调用是否具备执行权限。
from typing import Literal, Any
from pydantic import BaseModel
from langchain.tools import tool, ToolRuntime

class Context(BaseModel):
    authority: Literal["admin", "user"]

# 创建带权限控制的tool,依赖ToolRuntime的内容进行判断
@tool
def math_add(runtime: ToolRuntime[Context, Any], a: int, b: int) -> int:
    """Add two numbers together."""
    authority = runtime.context.authority
    # 只有admin用户可以访问加法工具
    if authority != "admin":
        raise PermissionError("User does not have permission to add numbers")
    return a + b

# 创建带工具调用的Agent
tool_agent = create_agent(
    model=llm,
    tools=[get_weather, math_add],
    system_prompt="You are a helpful assistant",
)

# 在运行Agent时注入context
response = tool_agent.invoke(
    {"messages": [{"role": "user", "content": "请计算 8234783 + 94123832 = ?"}]},
    config={"configurable": {"thread_id": "1"}},
    context=Context(authority="admin"),
)
for message in response['messages']:
message.pretty_print()================================ Human Message =================================
请计算 8234783 + 94123832 = ?
================================== Ai Message ==================================
Tool Calls:
math_add (call_af70a5cf98be44b9b445efcf)
Call ID: call_af70a5cf98be44b9b445efcf
Args:
a: 8234783
b: 94123832
================================= Tool Message =================================
Name: math_add
102358615
================================== Ai Message ==================================
8234783 + 94123832 = 102358615。
# 验证计算结果是否正确
8234783 + 94123832102358615五、结构化输出
若想获得 结构化输出(Structured Output),可以在 create_agent 函数的 response_format 参数进行设定。在下面的例子中,我们用 BaseModel 定义输出格式,然后在 response_format 中指定该格式。
from pydantic import BaseModel, Field

class CalcInfo(BaseModel):
    """Calculation information."""
    output: int = Field(description="The calculation result")
# 创建带结构化输出的Agent
structured_agent = create_agent(
model=llm,
tools=[get_weather, math_add],
system_prompt="You are a helpful assistant",
response_format=CalcInfo,
)
response = structured_agent.invoke(
{"messages": [{"role": "user", "content": "请计算 8234783 + 94123832 = ?"}]},
config={"configurable": {"thread_id": "1"}},
context=Context(authority="admin"),
)for message in response['messages']:
message.pretty_print()================================ Human Message =================================
请计算 8234783 + 94123832 = ?
================================== Ai Message ==================================
Tool Calls:
math_add (call_8fa100c711384c31827efdea)
Call ID: call_8fa100c711384c31827efdea
Args:
a: 8234783
b: 94123832
================================= Tool Message =================================
Name: math_add
102358615
================================== Ai Message ==================================
Tool Calls:
CalcInfo (call_6680db5a929c414bae9d9adb)
Call ID: call_6680db5a929c414bae9d9adb
Args:
output: 102358615
================================= Tool Message =================================
Name: CalcInfo
Returning structured response: output=102358615
response['structured_response']CalcInfo(output=102358615)%autoawait on
agent = create_agent(
model=llm,
tools=[get_weather],
)
for chunk in agent.stream(
{"messages": [{"role": "user", "content": "What is the weather in SF?"}]},
stream_mode="updates",
):
for step, data in chunk.items():
print(f"step: {step}")
print(f"content: {data['messages'][-1].content_blocks}")step: model
content: [{'type': 'tool_call', 'name': 'get_weather', 'args': {'city': 'SF'}, 'id': 'call_2ac8ba7023254b01915d74c1'}]
step: tools
content: [{'type': 'text', 'text': "It's sunny in SF!"}]
step: model
content: [{'type': 'text', 'text': 'The weather in San Francisco (SF) is sunny! 🌞'}]
2)messages 模式
stream_mode="messages":每个 token 生成后流式更新
async def agent_invoke():
    content, last_node = "", ""
    display_handle = display("", display_id=True)

    async for token, metadata in agent.astream(
        {"messages": [{"role": "user", "content": "What is the weather in SF?"}]},
        stream_mode="messages",
    ):
        node = metadata['langgraph_node']
        if last_node and node != last_node:
            content += f"\n\n🔹 <b>node:</b> {node}\n📝 <b>content: </b>"
        if node == 'model' and token.content:
            content += token.content
        elif node == 'tools' and token.content:
            content += token.content

        last_node = node
        update_display(HTML(f"<pre>{content}</pre>"), display_id=display_handle.display_id)

print("打印工具节点和模型节点的输出结果:")
await agent_invoke()
打印工具节点和模型节点的输出结果:
3)values 模式
stream_mode="values":流式输出 State 的快照,可查看工具调用信息
async def agent_invoke():
    async for payload in agent.astream(
        {"messages": [{"role": "user", "content": "What is the weather in SF?"}]},
        stream_mode="messages",
    ):
        state = payload[0]
        if hasattr(state, "tool_calls") and state.tool_calls:
            if state.tool_calls[0].get('name'):
                print("name:", state.tool_calls[0].get('name'))
            if state.tool_calls[0].get('args'):
                print("args:", state.tool_calls[0].get('args'))

print("打印工具调用信息:\n")
await agent_invoke()
打印工具调用信息:
name: get_weather
args: {'city': 'SF'}